Showing posts with label collage. Show all posts

Sunday, April 27, 2014

File Folder Neigborhoods

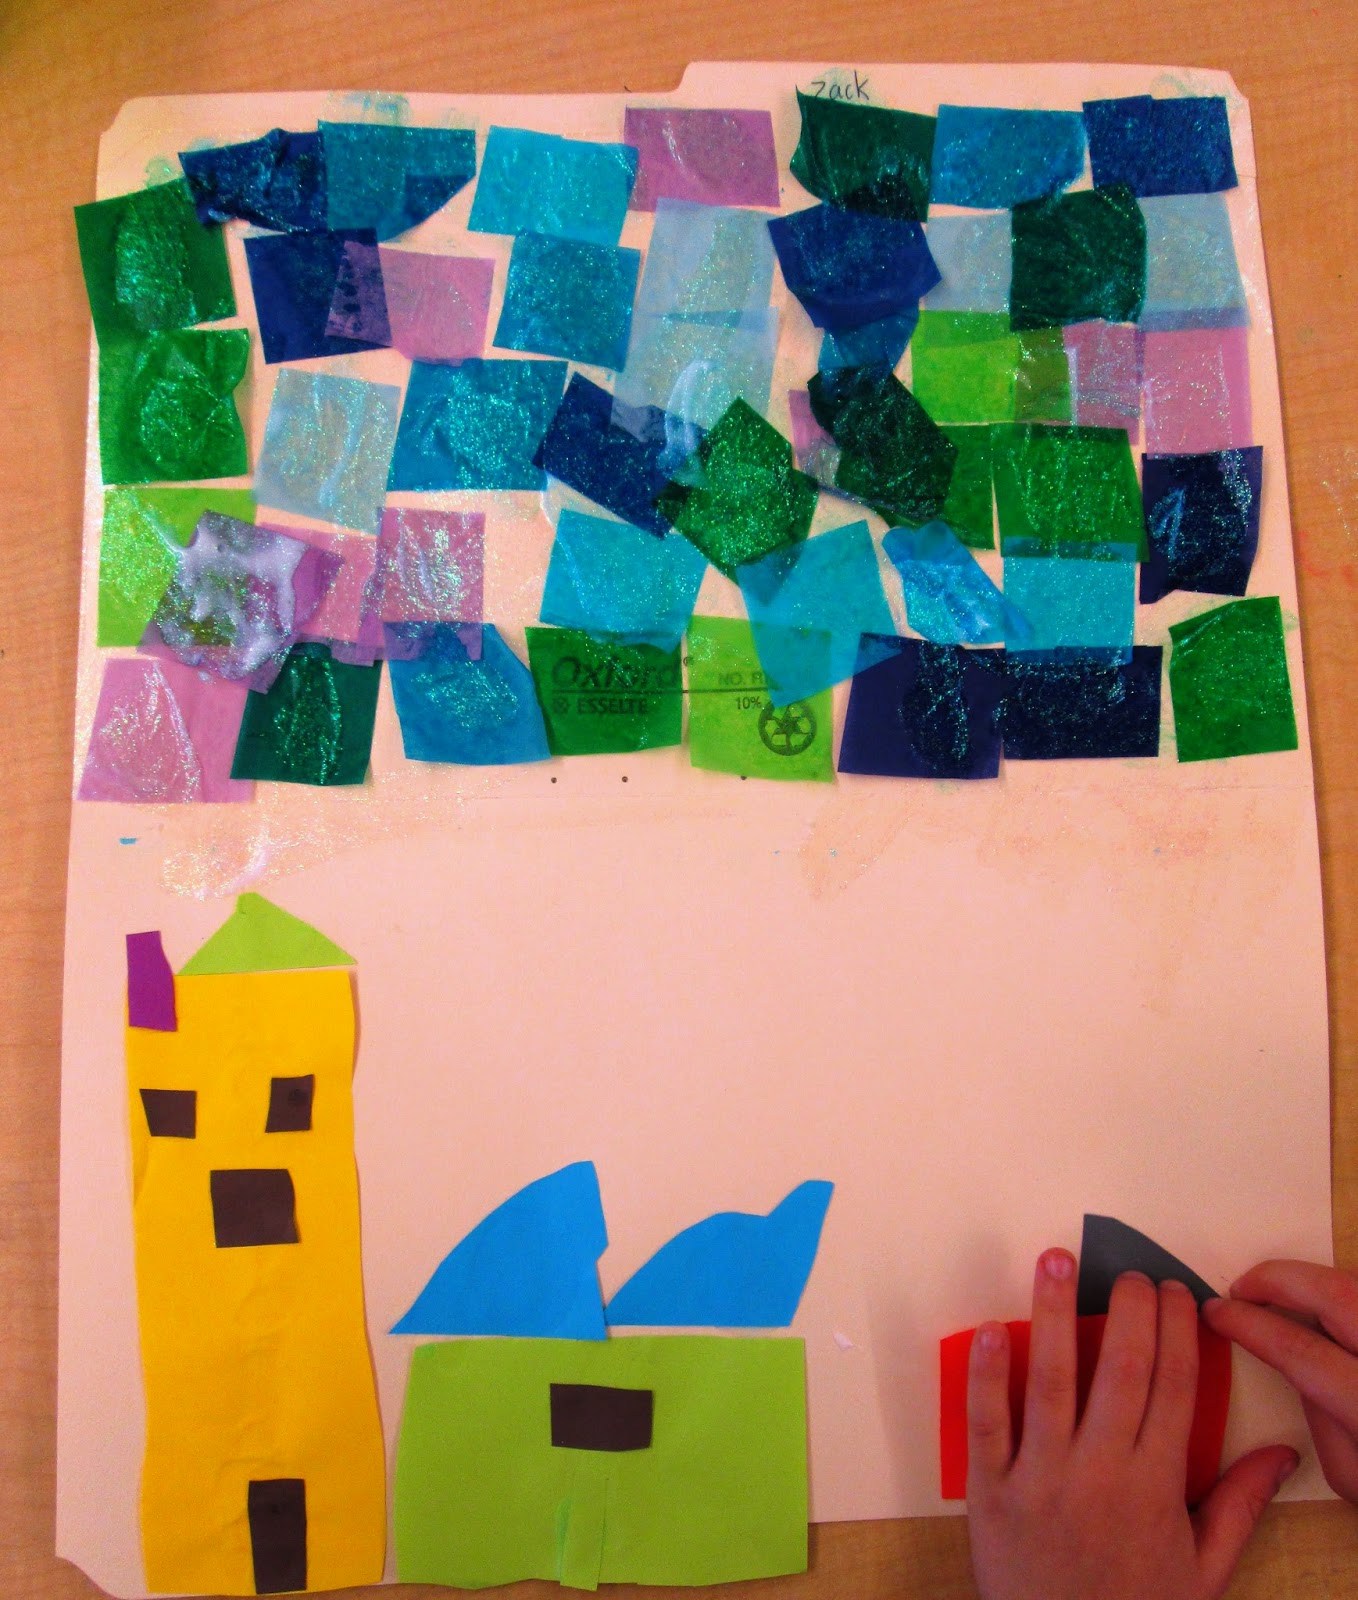
I am lucky, in that I see my kids every 3 days, for an hour at a time.  However, the flip side is that there is the potential to go through a lotta art supplies, especially with the Kindergarten crew, who tend to do shorter art projects to begin with.  So, how to keep their interest at the end of the school year, and not empty my supply cupboards?  File Folders.  Huh?  I had a bunch of leftovers, that the office was gonna ditch.  So, I wrote each student's name on one tab, and came up with this.  In MNPS curriculum, Kindergarten is to work on houses this 9 weeks.  They drew their own house, and we've been talking about how shapes work together to make things.  So, on the bottom of the inside, they used scraps, and created a neighborhood.  (3 houses was my requirement, some did more). At the end of art, it was a snap to clean up, and any necessary unglued parts could just be stored with their folder.  The next session, we did tissue collage on the top, to be the sky.  Then, they could continue working on the neighborhood.  Next session, we will finish the sky, by adding birds, bugs, hot air balloons, etc.  I am thinkging just having them draw contour line with sharpie.  And, my final plan is to have them create themself and their friends on the exterior of the folder.  So, there you have it.  Cheap, a great review, at least 4 artclasses of work (depending on how you stretch it) and fun, cause to the K's its kind of like a secret, with the picture being inside.  I'll let you know how it turns out, but so far, I think I love this idea.


Thursday, December 12, 2013

More Singers

I am in love with this project- it was a great chance to review some concepts, and the little singers are so sweet looking.  A definite keeper.


If you only knew the boy who made this-  it is sooooo him.

Wednesday, December 11, 2013

Winter Singers

I was reviewing the concept of near and far (placement and size) with my 1st graders as we did some winter landscapes.  It occurred to me that as pretty as the trees were, the pictures were a little... "Blah".  So, we created carolers to be in the foreground.  It was a cute way to finish up this project, and the kids were really pleased with the results.  It allowed us to work in a little direction following and paper sculpture skills- the arms bend out and give a 3-D effect.


Sunday, November 24, 2013

Magazine Turkeys and a little Mask

My Kindergarteners are proving a bit needy of some cutting and gluing practice (as well as some basic listening/direction following skills), so I channeled the Turkey Day energy that's been buzzin' for this project.  It started with just basic cutting/gluing to create the body, wings, feet and beaks.  I had the brown and orange paper pre-cut, and they followed along with me.  For the feathers, I pre-sized some magazine pages into manageable pieces.  They used those to create feathers.  I encouraged ovals, but some got a bit rectangular.  The kiddos seemed to really enjoy this project- especially the ones who got cartoon scraps. 


 Also, my 3rd Graders have been working on clay masks and I just had to share.  Below, one student begins the painting process.  (I use acrylic- it's messy danger, but it looks great on clay!)  The other is by a boy who clearly loves making masks.  It's so rewarding when you finally find the thing that excites a hesitant student!  When we paint, I set up paint stations.  The kids move their mask to the station, rather than me pouring paint for every table that may or may not be used.  I have a student with Autism, and traveling is not in her best interest- I allowed her to stay at her seat with color choices.


Saturday, September 28, 2013

End of the 9 Weeks

I am wrapping up the 1st 9 weeks of school (already?!?).  Here are some projects I'm doing with my students.  I find that the end of the 9 weeks is a great time to squeeze in some of those seasonal, or craftier projects that the kids love, and review some of the skills that may be a little lacking.  My students are a bit lacking in their craftsmanship- especially their cutting and gluing, so the more chances I have to review, the better.

Torn Paper Seascape- 3rd Grade

A watercolor wash for the sky, and torn paper for the sandy beaches and waves.


Owls- 1st Grade.  Combo of torn paper and cutting


Taken from the "Spectra" art series-the 1st teacher manuals MNPS ever provided. They were scripted, and came with slides.  But, there were a few projects in there that I still like to revisit.

Tuesday, September 24, 2013

Monster Mash

I see my kiddos 1 hour every three days.  That is an amazing amount of time- I am really blessed.  My deal with the kids is that we get the "have to" work done first- everything that MNPS says I'm supposed to cover in the 9 weeks.  If we have leftover time (and we usually do) we can do the craftier, more seasonal projects that the kids don't get a chance to do in their classroom anymore.  And, if I can review a few skills along the way,  the kids don't need to know about that.  I came across this on Pinterest, and had just happened to be working on facial proportion with the 3rd graders.  It was a good fit, as we were able to discuss why artists like Picasso might alter the proportion of the face.  After a quick run down of Cubism basics, we got out the construction paper, and created these cubist Frankensteins.  I told the kids that they were like the mad scientist.  This was a one day project with 3rd grade- and my goal was to get them thinking about their cutting and gluing.  They had a blast, and these are going to be a lot of fun in the hallway in October.  (Side note- I don't know about you, but I have to be very careful in how I present seasonal projects.  I did not present this as a Halloween project, rather as a Monster.  The kids brought up the idea of Halloween, but it was not something that I pushed.


)

Monday, April 15, 2013

A Cinderella Story

This 9 weeks in the MNPS curriculum for 1st Grade Art starts off with an observational drawing. I have been attempting to incorporate some Common Core themes into my art lessons, to help the students better connect with what they are learning.  In their classroom, Cinderella is one of the stories during this time.  So, I brought in a bunch of shoes, and we tried drawing them.  Couple of problems- I'm a girl, therefore, I wear girl shoes (and boy shoes are very expensive at Goodwill compared to girl shoes).  Needless to say, the boys were none to happy with this.  And, while the drawings were ok, they weren't really what I was hoping for.  So, the next time the kids came to art, I had them draw one of their own shoes.  This, they loved.  Partly, because of the novelty of putting ones shoe on the desk, and partly, because they got to take off their shoe.  Whatever the reason, I was really much happier with the drawings.  We added the socks/legs this class session, and, in keeping with the Cinderella theme, we folded a "book".  On the inside, they wrote their name.  On the outside, they wrote (copied) "Who Fits This Shoe?" and then, with prompts, they wrote 3 clues about themselves, so that viewers can guess the shoe.  One sentence started with "I have", one with "I am" and one with "I like".  I was pleased with the results overall, and doing the leg also gave me a chance to review the concept of observational drawing, as we had to look at our legs, and find any moles, freckles, hairs, scabs, band-aids, etc, so that they could be added to the leg as another glue.
Lovin' the band-aide


This 1st grader is not only a fashion plate, but has a great eye for detail when drawing.  

Tuesday, March 12, 2013

Slang Terms/Robert Indiana

I showed my 3rd graders the famous "LOVE" print by Robert Indiana, as we were talking about lettering, and word art.  We then generated a list of popular "Slang" terms that we use today- which also got us into a talk about texting shorthand.  From there, I asked students to pick a word or term that was 4 letters or less.  ( I promised them they'd appreciate my limiting them later).  After learning about block lettering, each student created the letters they'd use to spell their term, and drew/colored patterns inside each one (side note- I learned that some students colored/designed the negative space of their block letters- not sure if this is a right brain vs left brain thing?)  Anyway, after the designing was done, we took a break, and made our backgrounds using the simple tissue paper/starch collage method.  An oldie, but a goodie.  While the papers dried, we cut out our letters.  Then, we arranged them and stuck them on the background.  Now, some students were very quick, and able get their letters on the paper while it was still wet.  We still needed glue, but I found that they glued flatter.  The next step was to trace the letters with black string, for contrast.  Finally the students wrote other words with the same meaning around the negative space left from their words.  This project was done in many steps- it took a full day for the block letters/designs, another for the background/finishing of the letters, and still another for the yarn and the sharpie words.  And, I did have them make a list of their words before putting them on the project, to reduce spelling issues. There was a moment in the middle of this that I wondered what we had gotten into, but in the end, the kids loved the graphic nature of the letters, and I loved the relevance to their everyday life.  We had a great conversation about words we use with our friends vs words we use with our teachers, bosses, etc.  I had hoped that they would divide the colors between the letters and the background with warm and cool colors- and we worked on it, but in the end, the marker temptation was too great, and they just could not limit their colors. I am hanging these for our upcoming Art Show on Thursday, and just love as the other grades walk by wondering why they never do cool projects like this.


Tuesday, February 5, 2013

Primary/Geometric Birds

Birds are OVER, clouds are UNDER the wire.

Clouds are Organic, while birds are Geometric

The kiddos had not used the feathers, and were delighted with the chance.
I came across a lesson on Pinterest which used geometric shapes to make "birds".  It was just cute enough to try with the Kindergarten Crew.  It gave me the opportunity to review Primary/Secondary colors, as well as introduce Geometric/Organic shapes.  It involved so much opportunity for vocabulary, that it is a new favorite in my book.  I read a Bird Book to inspire us, which reviewed the concept of Near and Far.  We were able to discuss contrast, in the context of using a variety of colors- red beaks on red birds just don't show up.  And, Over/Under also came up too.  Such a fun little lesson, packed with so much good art information.  Little details like the wiggle eyes and the feathers encouraged the kiddos to stay focused and continue on even when a little tuckered out.  I am pleased with the results, and  I will be showcasing them in our upcoming Art Show. 

Tuesday, November 13, 2012

On the Farm


The kindergarten students and I have been working on texture.  We created these little farms by using odds and ends around the art room.  Way back at the beginning of the year, this group practiced painting by covering an entire paper with sky color.  We used it as a backdrop for our Red Grooms exhibit, and now that the exhibit is down, we recycled them by making our farm sky with them.  Wallpaper was used for the ground.  The rest is an assortment of crafty left overs. 

Saturday, November 3, 2012

Torn Paper Animals (And a spooky picture)


 If you follow my blog, you know I am in favor of a good Torn Paper Collage. I worked with my 1st graders on an animal unit, in collaboration with their Common Core lessons on animals.  We looked at both Realistic interpretations of animals, and unreal interpretations.   For this project, we looked at Henri Mattisse and his work "The Snail".  We talked about how it does not look like a real snail, but the animal is in the arrangement of the paper.  We had also looked at Durer and Rousseau by this point, so they had a way to compare animals in artwork.  No scissors or pencils were allowed, but I do have a nice collection of animal magazines that the librarian was getting rid of.  (ZooBooks is a wonderful series, that I highly recommend.)  They were allowed to refer to their animal magazine as they arranged their paper.  I think we had good results.  I love torn paper because it forces some problem solving, and students tend to work a little bigger.
I could not resist showing you my 4th grade project.  We were looking at color schemes, and how the colors used in a landscape gives a feeling to a work of art.  We steered clear of Halloween, but instead worked toward creating an eerie scene- I told the kids it was kind of like watching a scary movie- it's not the monster that's so scary, but that moment right before, when you know it's a bout to jump out.  My 4th graders are a bit low in their skills, but I was pleased with this one.  I gave each student Blue, Purple, Black and White, asking them to mix colors to create a variety of tints and shades.